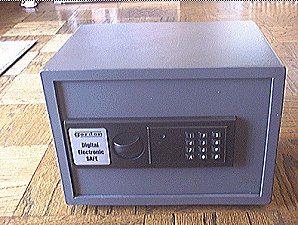
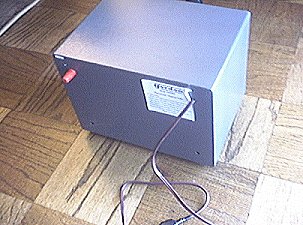
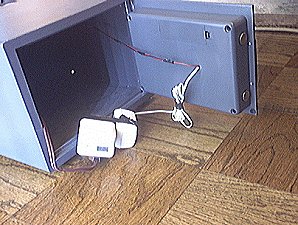
Secure Time-locked Key SafeSubmitted by: lockednchaste@yahoo.comThose of you who frequent the lockmeup.com bulletin board have already read this, but news isn't news in the world of chastity until it lands on Altarboy. I've created a fully functional and secure time-locked key safe that I built in a half- hour for less than $100 with minimal electronic skills required. If you can install a light fixture in your home, you can make this... NOW HEAR THIS --- NO SOLDERING REQUIRED!!! I know. I'm a bit excited. But I have reason why. All previous examples of a key-safe on the web have been insufficient for most of our needs. A recent example that we all know of that's been running on sufferware.com is a masterpiece of electronics in which a keysafe is connected to one's PC and controlled by a secure remote web server. The downfall to this is that the construction is extremely complex and to an electrical novice, requires a PhD in electrical engineering. My goal was to finally create a working key-safe that could be built for an affordable price with minimal electrical skills and parts that were available to anyone. Amazingly enough, I have a keyholder. My wife. Why you ask did I build a self- bondage lovers device if I have someone willing to lock me up? Well, on a recent road trip, my wife left the keys to my belt at home. I was belted hours from home while on vacation with my wife and there was no hope of escape. I explained how turned on I was because I knew that the belt was inescapable regardless of how well I coerced my wife. After the post, I spoke to my wife about it and amazingly enough, she liked it also. She explained to me what a pain in the ass (her words) that holding my chastity key can be. She loves having me locked up but she hates my whining and indifference while being locked up. She says that sometimes, it's hardly worth the effort. Punishment games regarding my whining didn't work for us. I just whined to get her to keep me locked up longer. Her only desire to keep me locked, she said, was to get all of the extra attention that I gave her since my own needs were not an issue. Okay. Here goes my explanation of the construction. The first and most expensive item you will need to purchase is a digital electronic safe similar to the ones found in hotel rooms. They are about 12" cube and made of 9 gauge steel. They have a digital kepad that is used to actuate a solenoid and allow the tumbler to be turned. I purchased mine at http://www.harborfreight.com for $50 but there are a bunch of hits on the web for similar products. One thing to note is that my specific model is made by GORDON and it remembers your keycode if the power is lost. This is important as power is the key component in our construction and we will be removing the enclosed batteries. I'm not sure if other models have this memory feature. I've also seen these safes in home centers and Wal-Marts but they tend to run $75-$100. The web wins again. We will also need an analog or digital light timer that one uses to turn their lights on and off while on vacation. Most are 24 hours but if you look you'll find a week long timer. It allows you to program power on and off for up to a week. This means that you can lock the safe for up to a week at a time. The digital feature allows for a dozen different program modes as well as being able to set programs a week in advance to the minute instead of the analog timer's 3 hr precision. If you go digital, be sure that the timer has a battery backup in case you lose power. Finally, you'll need a 6 volt transformer. I know. I'm getting complicated. Where does one go for that? ANYWHERE that sells electronics! They are those fat boxlike plugs that one uses to operate radios or camcorders without batteries. Even some cell-phone chargers are 6 volts. You probably have a bunch around the house. Just read the plug and find one that's 6 volts. If you need one, just go to Radio Shack or Best Buy or Wal-Mart and buy a radio or camcorder or cell-phone AC adapter that says 6 volts. It should cost under $20. You'll also need some electrical tape, an extension cord, and some hand tools. 1)First, become acquainted with the normal operation of you safe by reading the instructions. Now you can remove the four screws that hold the inside panel onto the door of the safe. You can remove the batteries if you wish. They won't be needed. Drill a small 1/4" hole into the plastic panel for later. 2)Clip the end adapter off of your transformer and strip off some of the insulation leaving the boxy plug with a wire extending out of it. 3)Locate the two wires (red and black) leading from the inside circuit board to the battery compartment. Clip these wires close to the battery compartment and strip the ends of the wires. Feed your transformer wire through the hole you drilled into the plastic panel with the loose end leading inside the panel. Now connect the red wire coming off the circuit board to the little wire with writing on it from the transformer. Connect the black wire coming off the circuit board to the wire with no writng on it coming from the transformer. You can simply twist the wire ends together and cover with electrical tape or you can use some wire nuts. Now, if you've done this right, and this was the hard part, you should be able to plug the transformer into the wall and operate your safe normally as if it still had the batteries in it. 4)Now, cut the extenion cord a few inches from either end and feed it through one of the predrilled anchor holes in the bottom of the safe. Be sure that the end with the prongs is on the outside to be able to be plugged into a wall outlet. No you can repair the cord with electrical tape and/or wire nuts. 5)Resecure the plastic panel to the interior door of the safe. Plug your light timer into the extension cord and your transformer into the light timer.
   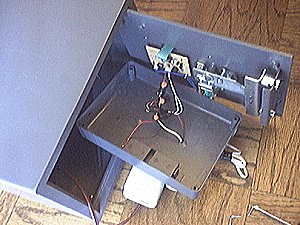 Also, I have a fix for those of you that may have a keysafe that doesn't remember its combo during a power outage. All of the safes have an interior switch that allows you to reset the combo once depressed. For obvious reasons, this switch is located inside the safe. It's simple to extend the wires on the switch and run it out one of the anchor holes in the back of the safe. Remember, the keypad's combo is not the focus of this contraption. It is the power restriction to the keypad that makes this device work. If your safe forgets its combo, you will now be able to reset it on the spot while it is still locked. However, this will not work unless the timer powers up the safe. Until then, you're still locked up. You're done! All you need to do now is set your appliance timer and set it to turn on when you want to open the safe. Now plug the cord coming out of the safe into a wall outlet. When the appliance timer turns on, it will send power to the keypad to let it operate normally and open the safe. Some notes.....
I'd love some feedback on this project and I'll be happy to answer any questions you may have. Be advised, however, that I am an electrical novice. I'm sure that many of you with electronic experience will have some more ideas but my goal was to keep this simple. Write me at lockednchaste@yahoo.com
Page last updated 04-Apr-10 by: Altairboy@aol.com |